2
2Requirements
- Completion of the following quests:
QUEST 89 · MEMBERS
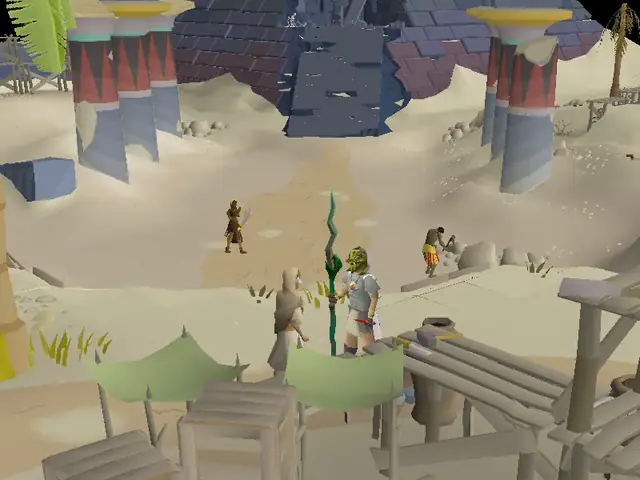
This chapter of the quest takes our hero deep under the mountains of Arandar to put a stop to the evil plans of the mourners. If our hero is to succeed, they must solve one of the most complicated puzzles in all of Gielinor.
Talk to Arianwyn in Lletya.
STEP BY STEP
Follow the chapters below. Click any screenshot or diagram to view it at full size.
Begin by speaking to Arianwyn in Lletya. He will tell you to go and stop the mourners from excavating under West Ardougne, and that you need a key from Essyllt to enter the excavation site.
Next, put on your full mourner gear. Bring a teleport crystal, and some food if you have low Defence or do not have 43 Prayer for Protect from Melee. Also, bring a chisel. Go to the basement of the Mourner HQ in West Ardougne, and talk to Essyllt.
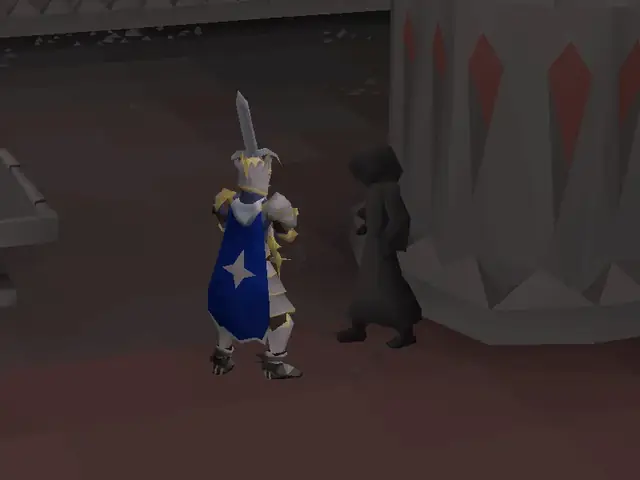
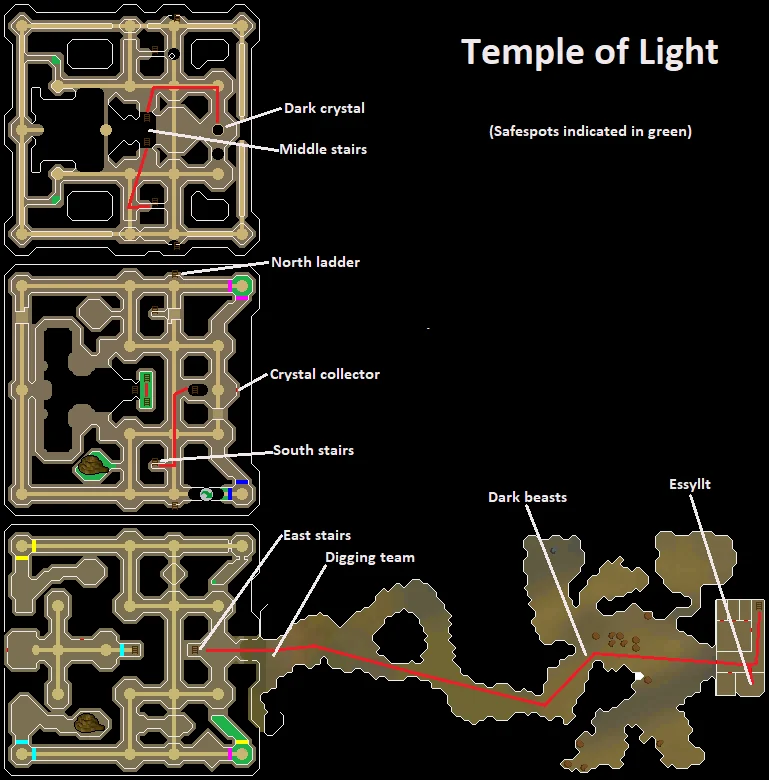
He will give you a new key to the nearby tunnels that they dug to the Temple of Light. He will ask you to find the digging team. Leave the head mourner's room and open the door on the west wall. Go into the tunnel. You will see level 182 Dark beasts.
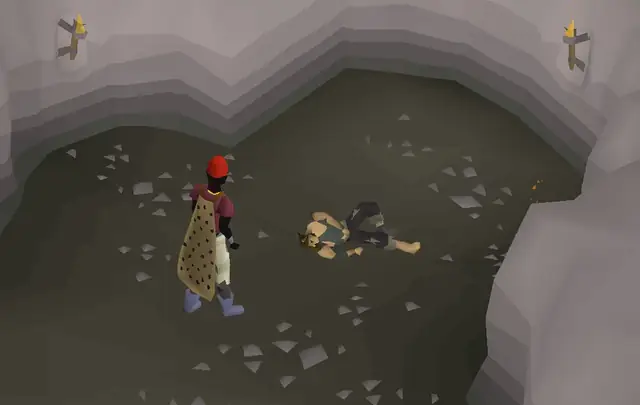
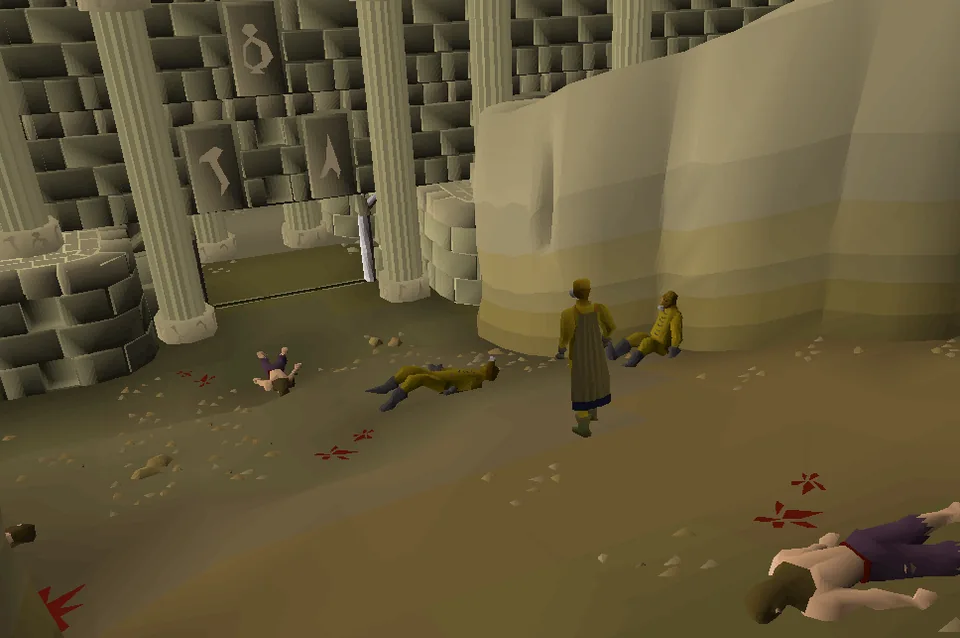
Run past them to the west whilst praying Protect from Melee, to reach the temple entrance. You'll see a cutscene showing the digging team; shortly thereafter, you may be attacked by level 73 shadows. Search the corpse of the guard slumped against the northern wall to get Edern's Journal.
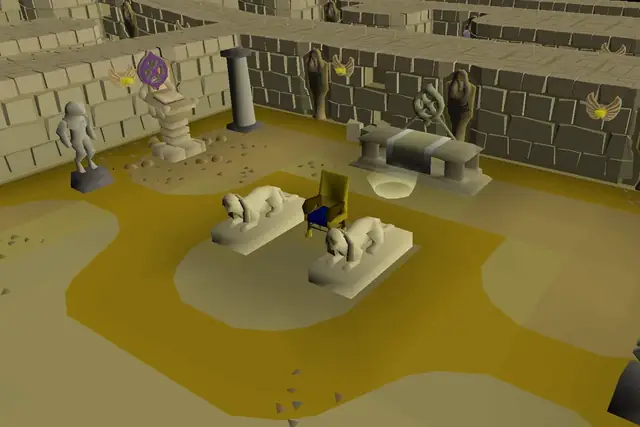
From there, go west and enter the Temple of Light.
Teleport to Lletya, and go back to Arianwyn. He will summon Eluned, who will enchant the black crystal in your inventory into a newly made crystal. It will be used at the end of the quest. Talk to Arianwyn again; then, you will need to prepare for a long and potentially frustrating puzzle. If you end up losing your crystal you can acquire a new one from Arianwyn.
If you want to attempt the puzzle in one trip, bring the mourner clothing, the new key, the crystal, and a catalytic/death talisman as well as your rope. As you progress through the puzzle you will need an increasing number of inventory spaces free in order to hold the mirrors and crystals which are used in the puzzle, which you will have naturally as you consume prayer potions and food. Alternatively, if you are lacking inventory space, you can pick up only some of the mirrors and crystals and go back and get more. You will need 4 inventory spaces for the first steps of the puzzle, increasing to 13 inventory spaces open for the last step of the puzzle. You may freely bank at any time, especially between the completion of each puzzle. If you leave in the middle of a puzzle, the puzzle will be unchanged when you return. However, you cannot bank the mirrors and crystals received in the temple, so it is not recommended.
If you're having trouble rotating mirrors while under attack, you can press 1 to rotate the mirror as soon as the dialogue comes up, if on PC—this should give you one or two rotation attempts between each attack.
| The Chest of Light | |
| The jingle that plays upon opening a chest for a crystal. | |
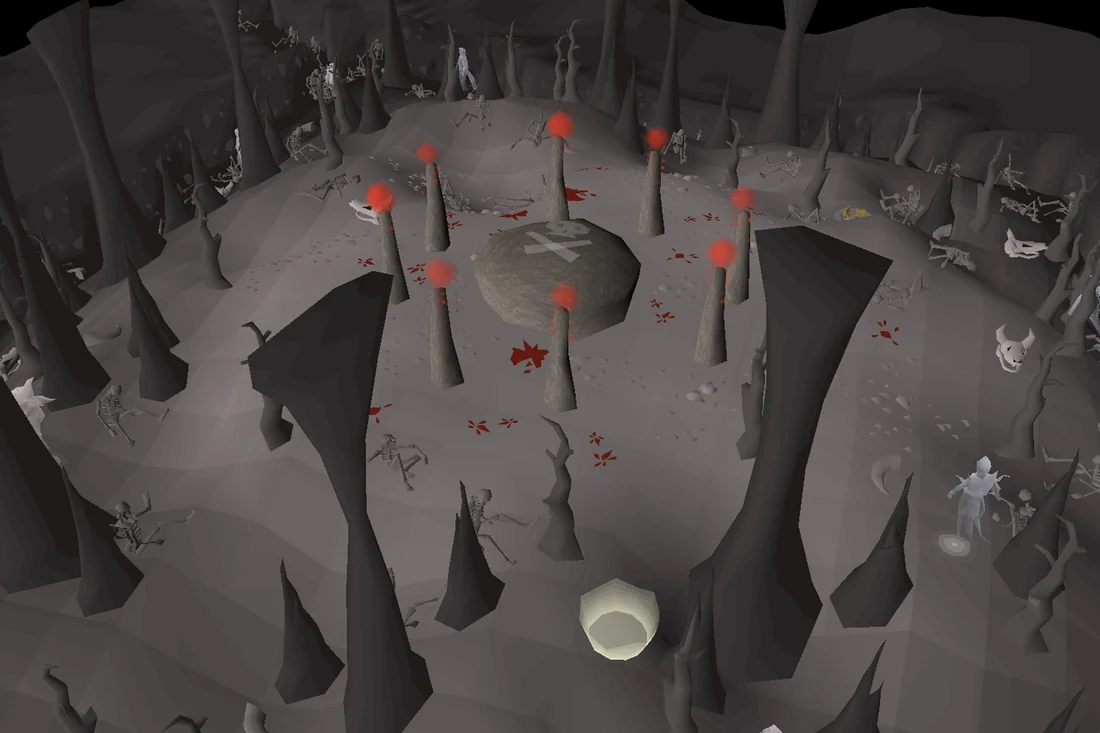
After you go through the final door, talk to the dwarf Thorgel. You will ask each other how you got to the altar, and he will reveal there is a passage from the Underground Pass created by him and his companions. You will ask if he knows Klank, after which he will realise you are the one who had slain Iban. Because of this, he agrees to trade you a death talisman in return for some supplies.
He gives you an item list that tells you what you need to get him:
You will need to give these items in more than one trip. Luckily, these items are all easily obtained and most players likely have many of them stored in their bank already. If returning to the bank in East Ardougne and running back to the altar through the mourner's headquarters, you will need to keep your mourner's outfit and new key for each trip. However, you should not need any other supplies, as these trips should be quick enough not to drain your prayer points to 0, and you can pray at the altar on the way back to West Ardougne each time you refill your inventory. If you get rid of Thorgel's list to save an inventory slot, you can ask him for another.
Warning: If you teleport out, make sure you turn the mirror towards the cyan door first! Otherwise, you'll lock yourself out and you'll have to go through the Underground Pass and enter the Temple of Light via the tunnel inside the dwarf camp. The entry at the dwarf camp is most easily reached from Lletya, which is fairly close to the elven land entrance to the Underground Pass; doing the Underground Pass in reverse to get to the dwarf village is a lot easier. To do this, enter the dungeon first on the elven side, down the well then down to the dwarf camp. The tunnel is located directly south of the main building. It is not marked on the minimap, so it is rather difficult to see.
On your final trip, make sure to bring the newly made crystal and teleport crystal instead of an Ardougne teleport.
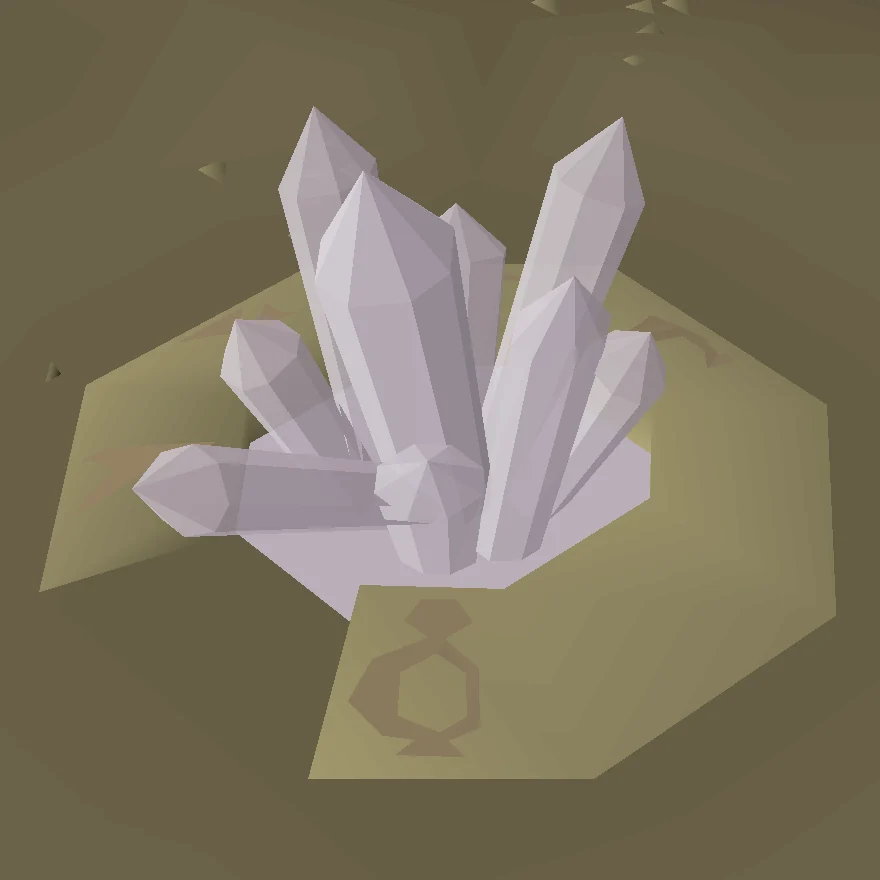
Use your catalytic talisman or death talisman on the Death Altar (or equip the tiara equivalents) then use the newly made crystal that Eluned repaired for you on it to charge it. (If you have 65+ Runecraft, and you brought a pure essence, make a death rune as well, to complete that step of the hard Ardougne Diary.) Exit the Death Altar, and then exit the final chamber and make your way to the black crystal that you observed at the beginning of the quest. Use this charged crystal on the black crystal. This will stop people from entering the temple for another thousand years! Go back to Lletya, and talk to Arianwyn for your reward.
Congratulations, quest complete!
Use this when you already know the route. The full walkthrough above includes explanations and diagrams.
Talk to Arianwyn in Lletya.
(optional) Note to Ironmen: if you do not have a death talisman, search the bookshelves for a book titled Prifddinas' history. You might need it later as part of the 50 items and this will allow you to potentially save time and a charge on your teleport.
Wearing your mourner gear, talk to Essyllt under the hideout in West Ardougne (north-east corner of town). He gives you the new key.
Run west through the cave, keep going until you find the dead bodies. There will be a cutscene.
Search a guard corpse for Edern's journal.
Follow the red line in the map to get to the black crystal.
Use your chisel to chip off a piece.
Return and talk to Arianwyn in Lletya to enchant your crystal.
Go back to the Temple of Light.
Take the eastern set stairs, that are directly in front of the entrance, to the middle floor.
Head to the area indicated by the rope on the guide map and use your rope on the rocks.
Drop your new key.
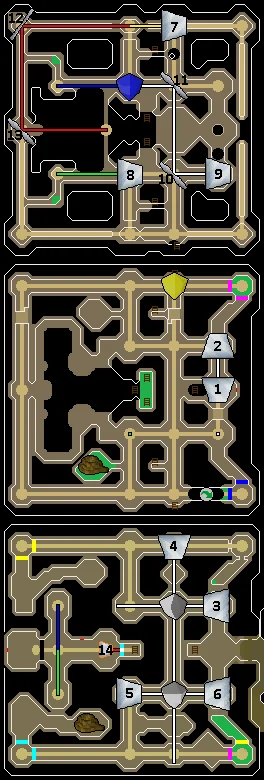
Head to the area marked with mirror #1 just east of the stairs.
Pull the crystal dispenser on the wall to reset the puzzle and then collect all of the items which includes mirrors and a Yellow crystal (Mourning's End Part II).
Say: Pull the lever. → Pull it. → Take all the items.
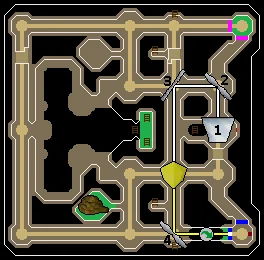
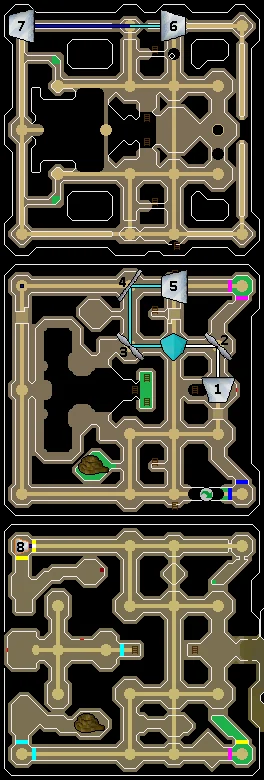
Place Hand mirror Mirror #1 to shine the light north.
Hand mirror Mirror #2 points west.
Hand mirror Mirror #3 points south.
Place the Yellow crystal (Mourning's End Part II). The light will turn yellow.
Hand mirror Mirror #4 points east.
Cross the gap to the other side. Use any agility boosts you have. You will have to cross this gap a second time later.
Open the chest to obtain 2 mirrors and a Cyan crystal (Mourning's End Part II).
Reset the puzzle at the crystal dispenser and collect all items.
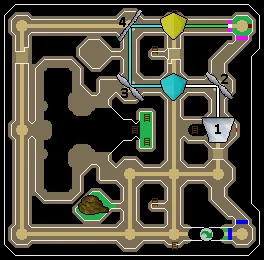
Hand mirror Mirror #1 points north.
Hand mirror Mirror #2 points west.
Place the Cyan crystal (Mourning's End Part II). The light will turn cyan.
Hand mirror Mirror #3 points north.
Hand mirror Mirror #4 points east.
Place the Yellow crystal (Mourning's End Part II). The light will turn green.
Open the chest to obtain 2 mirrors.
Do NOT reset the puzzle.
Pick up the Yellow crystal (Mourning's End Part II) and replace it with Hand mirror Mirror #5 pointing up to the top floor. Long side of the mirror should be pointing east.
Climb the north ladder to the top floor.
Hand mirror Mirror #6 points west. The light to the west turns blue.
Go back to the middle floor and take the south stairs up to the top floor.
Hand mirror Mirror #7 points down toward the middle floor. Long side of the mirror should be pointing east.
Climb to the bottom floor.
Head to Hand mirror Mirror #8, going through the eastern yellow barrier. Turn Hand mirror Mirror #8 to point south.
Go through the southern barrier and follow the path. Open the chest to obtain 2 mirrors and a Fractured crystal (horizontal).
Go back through the southern barrier and rotate the mirror to point east.
Exit through the eastern barrier.
Do NOT reset the puzzle.
Take the east stairs to the middle floor.
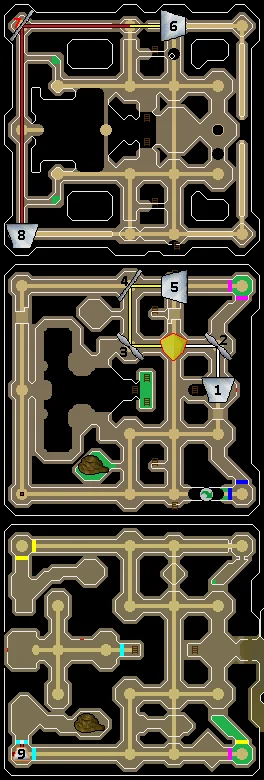
Take out the Cyan crystal (Mourning's End Part II) and place the Yellow crystal (Mourning's End Part II) instead. The light will now be yellow.
Climb up the south ladder to the top floor.
Rotate Hand mirror Mirror #7 to shine the light south. This light should be red. Run south to mirror 8.
Hand mirror Mirror #8 point down toward the middle floor. Long side of the mirror should be pointing north.
Climb down the south ladder to the middle floor.
Use the rope shortcut to reach the bottom floor.
Head to Hand mirror Mirror #9 and open the chest to obtain a Blue crystal (Mourning's End Part II).
Reset the puzzle
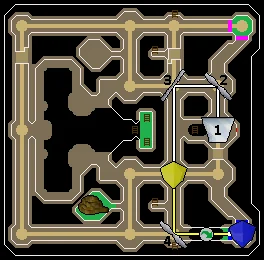
Hand mirror Mirror #1 points north.
Hand mirror Mirror #2 points west.
Hand mirror Mirror #3 points south.
Place the Yellow crystal (Mourning's End Part II). The light will turn yellow.
Hand mirror Mirror #4 points east.
Cross the gap to the other side.
Place the Blue crystal (Mourning's End Part II).
Remove Hand mirror Mirror #4.
Rotate Hand mirror Mirror #3 points up.
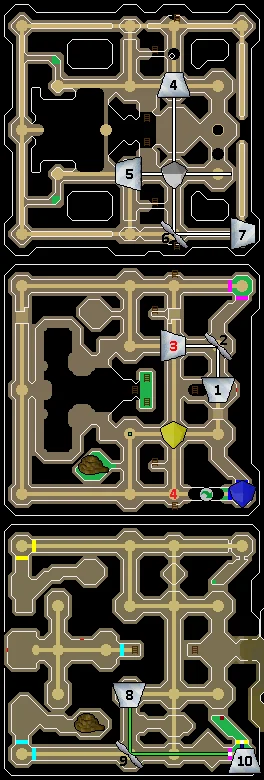
Use the south stairs to head to the top floor.
Place Hand mirror Mirror #4 in the new position pointing south.
Place the Fractured crystal (Mourning's End Part II).
Hand mirror Mirror #5 makes the western light point down. Long side of the mirror should be pointing east.
Hand mirror Mirror #6 makes the southern light point east.
Hand mirror Mirror #7 points down. Long side of the mirror should be pointing west.
Go to the bottom floor.
Hand mirror Mirror #8 points south.
Hand mirror Mirror #9 points east.
Hand mirror Mirror #10 points north.
Open the chest to obtain 3 mirrors and a second Fractured crystal (horizontal).
Reset the puzzle.
Hand mirror Mirror #1 points north.
Hand mirror Mirror #2 points down. Long side of the mirror should be pointing south.
Use the east stairs to go down to the bottom floor.
Hand mirror Mirror #3 points west.
Place the Fractured crystal (Mourning's End Part II).
Hand mirror Mirror #4 points the northern light up.
Place the Fractured crystal (Mourning's End Part II).
Hand mirror Mirror #5 points the western light up.
Hand mirror Mirror #6 points the eastern light up.
Climb the east stairs to the middle floor.
Place the Yellow crystal (Mourning's End Part II). The light will turn yellow.
Climb up the north ladder to the top floor.
Hand mirror Mirror #7 points west. You should see the light turn red at the pillar to the west.
Climb down the north ladder to the middle floor.
Climb up the south ladder to the top floor.
Hand mirror Mirror #8 points west.
Hand mirror Mirror #9 points west.
Hand mirror Mirror #10 points north.
Cross to the north part of the top floor via the middle stairs.
Hand mirror Mirror #11 points west.
Place the Blue crystal (Mourning's End Part II). The light will turn blue.
Hand mirror Mirror #12 points south.
Hand mirror Mirror #13 points east.
Go down the middle stairs twice to the inner part of the ground floor.
Rotate Hand mirror Mirror #14 so it points west.
Go through to the Death Altar.
When you're ready to leave, make sure to turn Hand mirror Mirror #14 back towards the entrance door, otherwise to get back in here you will need to go through the Underground Pass.
If you do not have a death talisman/tiara or catalytic talisman/tiara, refer to the full guide to get the 50 required items.
Returning to Thorgel: go up the eastern stairs, then south and up the ladder to the top floor to return to Thorgel. Climb the stairs down to the altar twice.
Make sure to bring your newly made crystal you obtained at the start of the quest.
Enter the Death Altar.
Use the uncharged newly made crystal on the altar.
Use the charged newly made crystal on the black crystal on the top floor.
Travel to Lletya.
Talk to Arianwyn.
Congratulations, quest complete!
QUEST COMPLETE
OSRS WIKI CONTRIBUTORS
Walkthrough text and preparation lists are adapted from Old School RuneScape Wiki contributors under CC BY-NC-SA 3.0. Game imagery © Jagex Ltd; individual image credits are available from their captions. This page is fan-made and not affiliated with Jagex.
KEEP QUESTING
Game icons © Jagex Ltd, via the OSRS Wiki. Interface icons by Lucide.