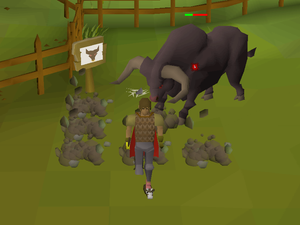
After completion of The Ides of Milk, players may fight Brutus as an instanced boss encounter within the Lumbridge cow field.
The easiest way to reach the Lumbridge cow field is by using the cowbell amulet, which teleports players there when charged with air runes. It additionally has a "Ring" option which will cause Brutus to respawn in 13 ticks (7.8s) after a chatbox message appears, rather than 36 ticks (21.6s). Note that ringing the cowbell amulet too late (ex. a few seconds before he's due to respawn) can result in a longer respawn time.
Fight overview
Brutus uses a basic melee attack with a max hit of 3, which can be negated through the use of the Protect from Melee prayer.
After four to five basic attacks, Brutus will use one of two special attacks; which one he chooses initially is random, but it will alternate between the two afterward. The damage of both special attacks scale with the player's Hitpoints level, with a max hit of upwards of 19. Low level players can expect to be hit for around 30-40% of their health by the special attacks. This damage ignores protection prayers, but may be avoided entirely by moving out of the way before Brutus moves.
- The player can avoid all damage from special attacks with either of the following methods:
- Walk forward into Brutus to his tail end before the special attack.
- Stand diagonally from Brutus when attacking and move diagonally away from him at the start of either of his special attack animations.
- Charge - Brutus will exclaim *growls*, then prepare to charge towards the player. There is a 3 tick (1.8s) window to move out of the way.
- Brutus will not use this attack if charging would result in him hitting a wall. As such, standing east of his spawn point will cause him to never use the charge attack.
- If sidestepping by one tile, a player can sneak in an attack as Brutus runs by the player minimising loss to DPS.
- Slam - Brutus will exclaim *snorts*, then prepare to slam the ground in front of it. There is a 4 tick (2.4s) window to move out of the way, and he will do this three times.
- The tiles that Brutus chooses is based on the player's position relative to him, in either a 3x1 (if the player is adjacent to him) or an L shape (if the player is diagonal to him). Both slam attacks also deal damage on adjacent tiles beneath Brutus.
- Timed properly, the player can sidestep by one tile then immediately move back to the tile they moved from while launching another attack allowing the player to treat this special attack as an opportunity for a free hit without taking damage.
-
The player moves out of the way of Brutus' charge.
-
Brutus can slam the ground in two possible ways depending on the player's position.
Attempting to set up a dwarf multicannon in the instance will result in the message It's far too muddy for you to set up a cannon here.
Brutus drops logs and oak logs quite often, as well as at least one guaranteed raw t-bone steak each kill. Bringing a tinderbox (with 15 Firemaking for oak logs) can be helpful to burn logs and cook steaks between kills, allowing for several back-to-back kills even if taking damage each kill. The altar in the Lumbridge church can be used to restore prayer as well.
Safespot cycle
Brutus cannot be flinched, but can be temporarily safespotted using nearby scenery, such as the plants and warning sign.
However, if the player is out of Brutus' attack range for 15 ticks (9s), he may use his charge attack to reach the player which can pass through obstacles, or he will exclaim *huff* and move around obstacles to reach the player. As such, lower levels may wish to utilise a set of safespots; with this method, players can avoid all attacks from Brutus. This method starts with tile 1 and as soon as Brutus moves, run to tile 2, etc.
| Tile markers |
|---|
[{"regionX":61,"z":0,"regionId":12851,"label":"3","regionY":29,"color":"#96FFFFFF"},{"regionX":59,"z":0,"regionId":12851,"label":"1","regionY":31,"color":"#96FFFFFF"},{"regionX":58,"z":0,"regionId":12851,"label":"2","regionY":33,"color":"#96FFFFFF"}] |
| Tile markers guide • Data |
Safespot
It is possible to safespot Brutus with ranged, magic or a 2 tile reach melee weapon in the southernmost part of the pen. This method requires you to lure Brutus to the north side of the two Food troughs. Stepping in between them (out of reach for Brutus) makes him unable to use his charge attack, nor can he path towards you in any way. This allows you to safely kill him without having to worry about special attacks.
Equipment
Free-to-play
Melee is generally the strongest option at higher levels, especially if using prayer such as Ultimate Strength and Incredible Reflexes. At lower levels, it will likely be outperformed by magic. Plateskirts are 1kg lighter than Platelegs, while providing the same bonuses, making them ideal for managing Run Energy. (Except for Rune god armour, with both weighing the same) Chainbodies provide higher Crush defence bonus than Platebodies, while also being lighter. Leather Gloves provide the same Crush defence bonus as Green d'hide vambraces, but are lighter.
| Slot | Item (most effective → least effective) | |||
|---|---|---|---|---|
 |  Rune full helm Rune full helm |  Adamant full helm Adamant full helm |  Mithril full helm Mithril full helm |  Steel full helm Steel full helm |
 |  Amulet of strength Amulet of strength |  Amulet of power Amulet of power |  Amulet of accuracy Amulet of accuracy | N/A |
 |  Red cape Red cape | N/A | N/A | N/A |
 |  Rune chainbody Rune chainbody |  Adamant chainbody Adamant chainbody |  Mithril chainbody Mithril chainbody |  Steel chainbody Steel chainbody |
 |  Rune plateskirt Rune plateskirt |  Adamant plateskirt Adamant plateskirt |  Mithril plateskirt Mithril plateskirt |  Steel plateskirt Steel plateskirt |
 |  Rune scimitar > Rune scimitar >  Barronite mace Barronite mace |  Adamant scimitar Adamant scimitar |  Mithril scimitar Mithril scimitar |  Steel scimitar Steel scimitar |
 |  Mooleta > Mooleta >  Rune kiteshield Rune kiteshield |  Adamant kiteshield Adamant kiteshield |  Mithril kiteshield Mithril kiteshield |  Steel kiteshield Steel kiteshield |
 |  Gilded d'hide vambraces Gilded d'hide vambraces |  Leather gloves Leather gloves |  Leather vambraces Leather vambraces | N/A |
 |  Decorative boots (gold) Decorative boots (gold) |  Decorative boots (white) Decorative boots (white) |  Decorative boots (red) Decorative boots (red) |  Fancy boots / Fancy boots / Fighting boots / Fighting boots / Fancier boots Fancier boots |
Inventory
 | |  | |
| | | |
| | | |
| | | |
| | | |
 |  |
- Cowbell amulet
- Food
- Strength potion or cooked t-bone steak to boost Strength level
- Tinderbox to light logs for cooking raw t-bone steaks mid-trip (optional)
While not as strong as melee or magic, ranged has the advantage of being able to use temporary safespots, as outlined above. It is also cheaper than magic, making it useful for lower levels that do not have good melee stats or the money to spend on runes. Gilded will only provide extra defence bonuses.
| Slot | Item (most effective → least effective) | |||
|---|---|---|---|---|
|  Coif Coif |  Leather cowl Leather cowl | N/A | N/A |
| Amulet of power | Amulet of accuracy | N/A | N/A |
| Red cape | N/A | N/A | N/A |
|  Green d'hide body Green d'hide body |  Studded body Studded body |  Hardleather body Hardleather body |  Leather body Leather body |
|  Green d'hide chaps Green d'hide chaps |  Studded chaps Studded chaps |  Leather chaps Leather chaps | N/A |
|  Maple shortbow Maple shortbow |  Willow shortbow Willow shortbow |  Oak shortbow Oak shortbow | N/A |
 |  Adamant arrow Adamant arrow |  Mithril arrow Mithril arrow |  Steel arrow Steel arrow | N/A |
|  Green d'hide vambraces Green d'hide vambraces | Leather vambraces | N/A | N/A |
|  Leather boots Leather boots | N/A | N/A | N/A |
Inventory
| | | |
| | | |
| | | |
| | | |
| | | |
| |
- Cowbell amulet
- Food
- Tinderbox to light logs for cooking raw t-bone steaks mid-trip (optional)
Brutus has a 25% elemental weakness to earth spells, which means that they have 25% increased accuracy and damage than normal, making them the best option at low levels. Magic can also use temporary safespots like ranged can. However, the rune cost for higher level spells like Earth Blast won't be covered by Brutus' drops.
| Slot | Item (most effective → least effective) | ||
|---|---|---|---|
|  Blue wizard hat / Blue wizard hat /  Wizard hat Wizard hat | N/A | N/A |
|  Amulet of magic Amulet of magic | Amulet of power | Amulet of accuracy |
| Red cape | N/A | N/A |
|  Blue wizard robe / Blue wizard robe /  Black robe Black robe |  Zamorak monk top Zamorak monk top | N/A |
|  Zamorak monk bottom Zamorak monk bottom | N/A | N/A |
|  Staff of earth / Staff of earth /  Staff of air Staff of air | N/A | N/A |
| Leather gloves / Leather vambraces | N/A | N/A |
| Leather boots | N/A | N/A |
Inventory
| | | |
| | | |
| | | |
| | | |
| | | |
 |  | | |
- Cowbell amulet
- Food
- Runes to cast earth spells
- Tinderbox to light logs for cooking raw t-bone steaks mid-trip (optional)
Members
| Slot | Item (most effective → least effective) | |||
|---|---|---|---|---|
|  Torva full helm / Torva full helm / Dharok's helm[a] Dharok's helm[a] |  Neitiznot faceguard / Neitiznot faceguard / Oathplate helm Oathplate helm |  Void melee helm[b] Void melee helm[b] |  Blood Moon helm > Blood Moon helm > Helm of Neitiznot Helm of Neitiznot |
|  Amulet of rancour Amulet of rancour |  Amulet of torture >Amulet of strength Amulet of torture >Amulet of strength |  Amulet of fury / Amulet of fury / Bonecrusher necklace Bonecrusher necklace |  Amulet of glory Amulet of glory |
|  Infernal cape Infernal cape |  Fire cape Fire cape | N/A | N/A |
|  Torva platebody / Torva platebody / Dharok's platebody[a] Dharok's platebody[a] |  Bandos chestplate Bandos chestplate(or:     ) ) |  Elite void top[b] Elite void top[b] |  Obsidian platebody Obsidian platebody |
|  Torva platelegs / Torva platelegs / Dharok's platelegs[a] Dharok's platelegs[a] |  Bandos tassets Bandos tassets(or:    ) ) |  Elite void robe[b] Elite void robe[b] |  Obsidian platelegs Obsidian platelegs |
|  Scythe of Vitur > Scythe of Vitur > Dharok's greataxe[a] Dharok's greataxe[a] |  Soulreaper axe > Soulreaper axe > Inquisitor's mace[c] Inquisitor's mace[c] |  Blade of Saeldor / Blade of Saeldor / Ghrazi rapier / Ghrazi rapier / Dual macuahuitl[d] Dual macuahuitl[d] |  Noxious halberd / Noxious halberd / Abyssal tentacle > Abyssal tentacle > Abyssal whip Abyssal whip |
|  Avernic defender Avernic defender |  Dragonfire shield / Dragonfire shield / Dragon defender Dragon defender |  Rune defender / Rune defender / Antler guard / Antler guard / Toktz-ket-xil Toktz-ket-xil | N/A |
|  Rada's blessing 4 Rada's blessing 4 |  God blessing / God blessing / Rada's blessing 3 / Rada's blessing 3 / Rada's blessing 2 Rada's blessing 2 | N/A | N/A |
|  Ferocious gloves Ferocious gloves |  Barrows gloves Barrows gloves |  Rune gloves / Rune gloves / Void knight gloves[b] Void knight gloves[b] |  Regen bracelet > Regen bracelet > Combat bracelet Combat bracelet |
|  Avernic treads (max) Avernic treads (max) |  Primordial boots Primordial boots |  Dragon boots (or: Dragon boots (or:   ) ) |  Guardian boots / Guardian boots / Granite boots Granite boots |
 |  Ultor ring Ultor ring |  Berserker ring (i) Berserker ring (i) | N/A | N/A |
 |  Crystal halberd / Crystal halberd / Dragon claws / Dragon claws / Burning claws Burning claws |  Dragon dagger Dragon dagger | N/A | N/A |
 | | | |
 | | | |
| | |  |
| | | |
| | | |
| | | |
Inventory
- Cowbell amulet
- 4 divine super combat potions
- Locator orb or dwarven rock cake if using Dharok's
- 11-14 prayer potions
- Rest cheap food, such as monkfish