LOCAL OSRS REFERENCE

The Forsaken Tower/Quick guide

Source revision 14744589 · Saved 2026-09-27 · Sources & credits

On this page
This quest has an in-depth guide.
It contains a more detailed description of dialogue, cutscenes, and storyline.

Details

Start pointMap icon Talk to Lady Vulcana Lovakengj in Lovakengj. Show on map
Official difficultyIntermediate
Official lengthShort
DescriptionFor thousands of years, the Wintertodt has remained safely sealed behind the great Doors of Dinh. Alas, despite the best attempts of the Lovakengj smiths and the Arceuus mages, the doors are failing. Only Dinh himself knew the secrets behind the creation of these doors. Without his knowledge, there may be nothing to stop the Wintertodt escaping and bringing ruin upon Kourend. It is up to you to recover this knowledge.
Requirements
Items required
Recommended
Enemies to defeat None

Walkthrough

Start

  • Talk to Lady Vulcana Lovakengj in the Lovakengj Assembly building to the west of the southern bank. (Xeric's Talisman, Xeric's Inferno) (Chat 1•3)…
    1Yes.
    3I'll get going.
  • Go to the Wintertodt camp (Games necklace teleport).
    • Talk to Ignisia in the north-east of the camp if you haven't previously done so.
  • Talk to the dwarf Undor inside the camp. (Chat 4)…
    4I've been sent to help you.
    • If he tells you to talk to the "Fiery lass" Talk to Ignisia just to the north east, before returning to him.

The Hammer

Powergrid

  • Go to The Forsaken Tower to the east of Mount Karuulm, west of Lovakengj (north-east of fairy ring CIR, Battlefront Teleport or Skills necklace to Farming Guild).
  • Inspect the Display Case.
  • Go down the ladder behind the Display Case and open the north-eastern door.
  • Search the north-north-east crate for a generator crank.
  • Inspect the steam generator in the south. (Chat 1)…
    1Start the generator.
    • Start the generator.
  • Inspect the Power Grid. (Chat 1)…
    1Yes.
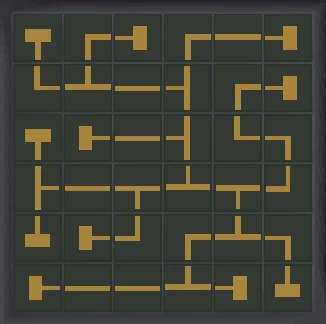
    • Align the Power Grid as shown below.

Furnace

  • Go up the ladder and then into the northern room. Search the cupboards for a tinderbox, 5-gallon jug, and 8-gallon jug.
    • Fill the 5-gallon jug with coolant through the coolant dispenser in the west.
    • Use the 5-gallon jug on the empty 8 gallon jug.
    • Fill the 5-gallon jug with coolant.
    • Use the 5-gallon jug on the 8 gallon jug.
    • Empty the 8 gallon jug (right-click check).
    • Use the 5-gallon jug on the empty 8 gallon jug (there should be 2 gallons in the jug).
    • Fill the 5-gallon jug with coolant.
    • Use the 5-gallon jug on the 8 gallon jug.
    • Fill the 5-gallon jug with coolant.
    • Use the 5-gallon jug on the 8 gallon jug.
    • You should now have 4 gallons of coolant in the 5-gallon jug. Use it on the furnace coolant west of the furnace, then light the furnace with the tinderbox.
  • If doing the diary task, smelt the adamantite bar now.

Potion

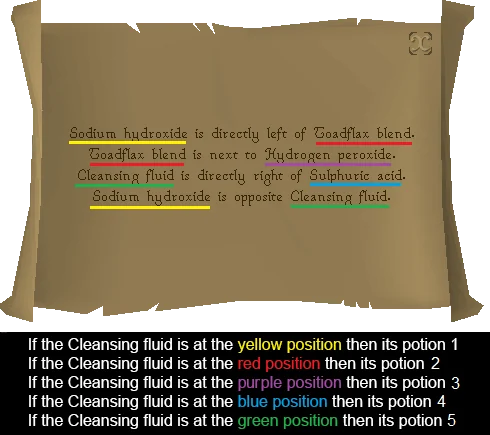
A visual explanation of the solution.
  • Go upstairs.
  • Open the door, then take the notes from the eastern cupboard.
  • Take the cleansing fluid from the northern table. The position will be random for everyone. Look at the notes to see the riddle: the fluids are listed in order of 1-2-3-4-5 (e.g. if cleansing fluid is the second potion mentioned in the fourth sentence, it is number 5).
    • Warning: If you choose the wrong potion, you will take high damage (25+) and become poisoned. This can be avoided by logging out before advancing the dialogue.
  • Use the cleansing fluid on the refinery to the south, then activate it (Chat 1•1)…
    1Yes.
    1Yes.

Altar

  • Go up the ladder.
  • There are four discs. In the following order, remove a disc from a pylon and place it on another pylon:
    • From West (W) to East (E)
    • From W to Centre (C)
    • From E to C
    • From W to E
    • From C to W
    • From C to E
    • From W to E
    • From W to C
    • From E to C
    • From E to W
    • From C to W
    • From E to C
    • From W to E
    • From W to C
    • From E to C
  • Go downstairs and get Dinh's hammer from the display case.

Finishing up

Rewards

Sources & credits

“The Forsaken Tower/Quick guide” by Old School RuneScape Wiki contributors, revision 14744589. Text adapted under CC BY-NC-SA 3.0; adapted text is shared under the same license. Formatting and navigation changed; Wiki scripts and editing controls omitted. Game imagery © Jagex Ltd. Imported image-file descriptions retain their own credits and licensing statements.

Original source address: https://oldschool.runescape.wiki/w/The_Forsaken_Tower/Quick_guide?oldid=14744589

This saved page may differ from the current game. Interactive Wiki tools are not reproduced.

About this library and media credits

Game icons © Jagex Ltd, via the OSRS Wiki. Interface icons by Lucide.